Millions of people around the world cook every day: they spend hours in the kitchen and meal preparation is one of the common shared activities across humanity. Between chopping vegetables, waiting for water to boil and cleaning up after yourself, cooking can be a real time suck. But what if you could halve your cooking time — and save hundreds of dollars a year on energy bills? This is just what we are going to investigate today.
The typical person allocates around 40 minutes to cooking dinner on weeknights. Add to that the breakfast and lunch prep, and you’re spending more than an hour a day standing in front of the stove. Meanwhile, your energy meter is still spinning and chalking up to monthly costs. The good news? With some clever tricks, you can cook an even better meal in less time and burning through less electricity or gas, while still enjoying home-cooked food that tastes great.
These are not your average “meal prep on Sundays” tips. We’re exploring cooking in detail — the techniques, the ingredients and the wisdom that chefs accumulate from their time in the kitchen. And whether you’re a busy parent, alone-at-last student or just someone who doesn’t want to “bother” much with their meals, these hacks will change the way you approach your everyday cooking. Let’s get started.
Why You Want to Save Time and Energy in the Kitchen
But before we delve into the tricks, I want to take a moment and consider why this topic matters as much as it does. Once time is gone, it’s gone forever. Also, when you’ve spent 90 minutes cooking dinner after a long day of work that’s 90 minutes you could have been hanging with family or doing hobbies or just goofing off. At hundreds of hours a year, this all adds up to one very inefficient method of cooking.
These are the kind of issues that also make energy costs a big concern. Ovens are energy gluttons, consuming from 2,000 to 5,000 watts an hour depending on the model. Your oven costs $0.30-0.50 an hour to run – if you’re running it for two hours a day, that can tack on $30-50 to your monthly electric bill. Gas ranges are a little less expensive, but still contribute greatly to utility bills. Multiply these numbers by every household, and there’s a massive environmental impact as well.
But here’s the exciting news: Small changes produce enormous outcomes. Removing only 15 minutes from your cooking time five days a week saves you more than 60 hours each year. It’s more than two extra full days you gain. And the same with only using your oven half the time, which can save you between $200-300 annually on your energy bill. With those numbers climbing so high, it’s easy to see that this is one of the most genius life upgrades you can make.
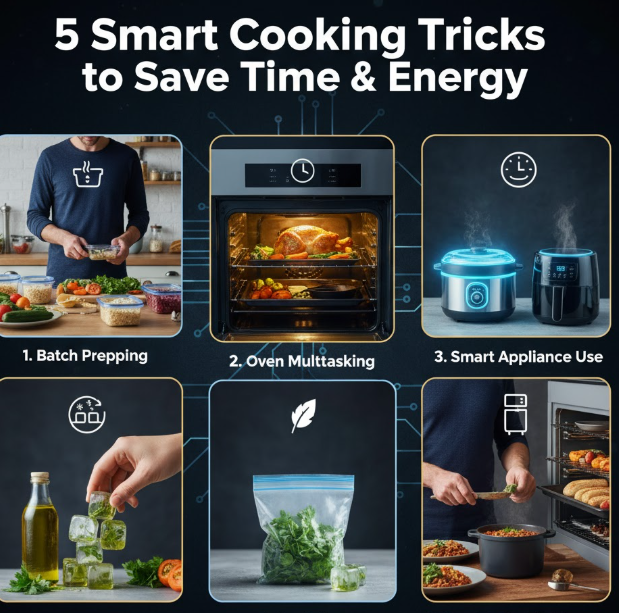
Trick #1: Master the One-Pan Wonder
The first game-changing trick is to cook whole meals in one pan. This is not about producing boring casseroles. We are talking about strategic layering and timing that enables you to cook proteins, vegetables and starches all together without compromising the food’s flavor or texture.
How It Works
Begin with ingredients that require the most cooking time at the bottom of your pot. Add root vegetables like potatoes, carrots, or squash to sit directly on top of your pan. Place your protein (chicken thighs, pork chops or salmon) atop or next to the vegetables. Finally, throw on quicker-cooking things like green beans, asparagus or cherry tomatoes in the last 10 to 15 minutes.
The magic is that ingredients give off moisture or flavor along the way, that fills out every other ingredient. You know what I mean if you’ve ever had greens flavored with chicken drippings. Vegetable juices keep proteins moist. All of it cooks together in a gorgeous harmony.
Time and Energy Savings
| Method | Cook Time | Active Prep | Energy Use | Cleanup |
|---|---|---|---|---|
| Classic Method | Proteins: 25 min<br>Vegetables: 20 min<br>Starches: 20 min | 15 min | 3 burners/oven | 3+ dishes: 15 min |
| One-Pan Method | Total: 35 min | 10 min | 1 burner/oven | 1 pan: 5 min |
| Savings | 30% less time | 65% less prep | 50% less energy | 40% faster cleanup |
Real-World Example
Think of an ordinary weeknight dinner like this: baked chicken, roasted vegetables and rice. Typically, you would cook chicken in the oven (45 minutes), make rice on the stove (20 minutes) and roast vegetables separately (25 minutes). That’s three cooking operations on several burners plus the oven for close to an hour.
With the one-pan approach, you set everything on a big sheet pan or into a deep skillet. The chicken and root vegetables go in initially at 400°F, and after 20 minutes of roasting you add the quick-cooking vegetables back to the pan for an additional 15 minutes. Total time: 35 minutes, simultaneous preparation.
Pro Tips for Success
Slice vegetables uniformly, so they cook in the same amount of time. If you’re using an assortment of vegetables, keep in mind that denser ones like carrots take longer to cook than softer ones like zucchini. Don’t be afraid to season the pot generously, as flavors will condense when everything is cooked together. Place a sheet of parchment paper under ingredients for even easier cleanup.
Don’t overcrowd the pan. The ingredients need room to breathe, i.e. air circulation, so they can caramelize (which is the whole reason we roast things: for that yummy caramelization!) and browning. Nobody wants soggy veggies. If your pan is too crowded, use two pans instead of one — you’re still saving time from making them all separately.
Trick #2: The Pressure Cooker Revolution
Pressure cookers can be intimidating, but man are they workhorses for saving time and energy. Today, modern electric pressure cookers (such as Instant Pots) have made the cooking method safer and easier than ever.
The Science Behind Speed
Pressure cookers retain steam inside a sealed pot to create pressure, which increases the temperature. The boiling point of water is 212°F at sea level, and higher pressure increases this temperature to somewhere around 250°F; due to the laws of physics you know that faster, hotter steam will cook your food much more quickly (50-70% time savings vs traditional cooking).
Because there is no air, less water evaporates from inside the pot meaning you use less liquid and retain more nutrients in your food. Flavors are more potent because nothing is lost. The payoff is meltingly tender meat, perfectly cooked beans and hearty stews in a fraction of the time it normally takes.
Energy Efficiency Breakdown
Pressure cookers reduce cooking time and use less energy. Here’s why: They cook food a whole lot faster, and they create less heat in your kitchen (meaning your air conditioner doesn’t have to work as hard in the summer). A conventional oven can use up to 1,500-3,000 watts versus an electric pressure cooker, which uses roughly 1,000 watts.
What You Can Make
The versatility is incredible. Dried beans that would usually take 2-3 hours cook in 20-30 minutes. Pork shoulder melts into shreds in under an hour, and tough cuts of meat (like brisket or short ribs) become fork-tender after just 40 minutes instead of three to four hours. Brown rice is done in 22 instead of 45 minutes. You can even bake cheesecake, whip up some yogurt and hard-boiled eggs that peel like a dream.
Practical Time Comparisons
| Dish | Traditional Time | Pressure Cooker Time | Time Saved |
|---|---|---|---|
| Beef stew | 3 hours | 45 minutes | 2 hours 15 minutes |
| Chicken stock | 4-6 hours | 1 hour | 3-5 hours |
| Pot roast | 3-4 hours | 45-60 minutes | 2-3 hours |
| Dried beans | 2-3 hours | 20-30 minutes | 1.5-2.5 hours |
| Brown rice | 45 minutes | 22 minutes | 23 minutes |
Getting Started
If you are new to pressure cooking, begin basic. Cook rice or hard-boiled eggs. After you’ve mastered the basics of operation, work up to one-pot meals like chili or chicken curry. The learning curve is much flatter than you think, and after a few good meals you’ll end up wondering how you ever lived without it.
As always, consult the instruction manual for your pressure cooker for any specific timing recommendations. These times will vary slightly depending on the make and model you use. Many of today’s modern pressure cookers have pre-programmed buttons for common foods so it gets even easier.
Trick #3: Cook in Batches and Freeze Strategically
Batch cooking is not just cooking vast quantities of food once a week. It’s a smart form of multiplication, one that conserves energy and leaves you with already-prepared meals for whenever you need them.
The Smart Approach
Cook four chicken breasts, not one. The energy expense is nearly the same, but now you have tomorrow’s lunch and next week’s dinner component. The oven that bakes a single sheet of cookies uses no more energy to bake three sheets. This multiplication method is the source of real savings.
The key is strategic freezing. Not everything fares well when frozen, but a lot of foods come out just as delicious after this treatment — provided that time and technique are on your side. Soups, stews, casseroles, cooked grains and marinated meats all freeze well.
What to Batch Cook
Focus on versatile base ingredients. Make plain chicken breasts, shredded beef or ground turkey in a big batch. These proteins operate in dozens of dishes. Get out a big pot and cook a lot of rice, quinoa or pasta. Roast a bunch of vegetables at the same time.
Sauces are batch-cooking gold. Make a gallon of marinara, not a quart. Make a double or triple batch of curry. Double or triple batches of pesto, salad dressings and taco seasoning. It’s these add-ons that make the difference between simple proteins and grains and something entirely different.
Storage Strategy
| Food Type | Storage Method | Freezer Life | Reheating Tip |
|---|---|---|---|
| Cooked proteins | Bagged portions | 2-3 months | Thaw in fridge |
| Soups/stews | Flat in freezer bags | 3-4 months | Heat on stovetop from frozen |
| Cooked grains | Portioned containers | 1-2 months | Microwave with splash of water |
| Sauces | Ice cube trays, then bags | 4-6 months | Thaw or add to pot directly |
| Marinated raw meat | Zip bags pressed flat | 3-4 months | Thaw and cook normally |
Energy Math
Running your oven one hour once a week uses less energy than running it for three hours at once. Why? Ovens consume additional energy preheating and restoring temperature levels after the door has been opened. When you batch-cook, you preheat once and hold temperature very well.
A normal preheat for an oven is around 0.8 kWh. If you preheat three times a week, that’s 2.4 kilowatt hours just for preheating. Batch cooking reduces that to 0.8 kWh a week, saving almost 7 kWh a month or over $1-$2 a month (that’s $12-24 annually!) in preheating alone.
Adapting It to Fit Your Life
You don’t have to spend your entire Sunday doing meal prep. Instead, when you make dinner, just double it. Making spaghetti sauce? Double it and freeze half. Grilling chicken? Grill 8 pieces instead of 4. This slow accumulation fills your freezer without the need for dedicated prep days.
Label the items inside and date them. There’s nothing more pathetic than mystery freezer food that you’re SURE will kill you if consumed. Mark directly on bags and containers with a marker. Future you will be grateful.
Trick #4: Your Microwave Is Not The Enemy
Microwaves are so maligned, but they are one of the most energy-efficient methods of cooking. The trick is to figure out what they do best, and use them strategically alongside other cooking methods.
Energy Efficiency Champion
Microwaves consume 50 to 80% less energy than traditional ovens because they heat the food directly rather than warming the air around it. A 1,000-watt microwave consumes less energy in 10 minutes than an oven does in its preheat cycle alone.
The US Department of Energy states that microwaves consume far less power than traditional ovens when cooking small meals. And particularly for reheating, nothing is more efficient than a microwave.
What Microwaves Do Best
Microwaves are good at heating up water-based foods. High-moisture vegetables are steamed to perfection in the microwave. Potatoes are baked in 8 minutes instead of an hour in the oven. Rice is instant or quick to cook. Frozen vegetables need no added water, and they preserve more nutrients as compared to boiling.
They are also excellent for prep work. Need to soften butter quickly? Microwave. Want to peel tomatoes? Microwave them for 30 seconds ahead of time. Soften brown sugar, melt chocolate or warm tortillas all faster and better in the microwave.
The Hybrid Cooking Method
Here’s where things get clever. Use your microwave for the slow part and traditional methods for the finish. The baked potato is a great example. Pop them in the microwave for 6-8 minutes until they are mostly cooked, and then slide them into a hot 400°F oven for 10 minutes so the skin can crisp. Total time: 18 minutes versus 60 minutes in the oven.
The approach is a good one for many foods. Microwave butternut squash for 5 minutes prior to roasting. Par-cook chicken thighs in the microwave, then sear for crispy skin in a hot pan. You get the texture and flavor you’re after in half the time with only half the energy.
Microwave Cooking Chart
| Food Item | Microwave Time | Energy Saving | Quality of Food Result |
|---|---|---|---|
| Baked potato | 6-8 minutes | 70% energy saving | Fluffy inside (finish in oven for crispy skin) |
| Frozen vegetables | 4-6 minutes | 75% energy saving | Better nutrient retention |
| Rice reheating | 2-3 minutes | 80% less energy | Fluffy, not dried out |
| Butternut squash | 5-7 minutes | 60% less energy | Speeds up roasting prep |
| Corn on the cob | 3-4 minutes | 70% less energy | Sweet, tender, no pot necessary |
Avoiding Common Mistakes
Cover food with microwave-safe lids to hold in steam (this speeds cooking and keeps food from drying out). Place food in a circle around the central area of the dish so that it heats up evenly. Stir or turn food over midway in the cooking process. If your rice or pasta are a little dry, add one tablespoon of water when you reheat them.
High power should not be used for everything by default. Medium power (50-70%) is best for gentle reheating, defrosting and cooking softer foods. It takes a bit longer but the results are much better in the end.
Trick #5: The Cold Start Method
This last trick might seem like a weird one, but it’s a true time and energy saver that professional cooks employ all the time. Cold start means adding food to a cold oven or cold pan, and subsequently turning on the heat, as opposed to waiting for the oven to preheat.
Why Preheating Isn’t Always Necessary
We’ve been conditioned to always preheat ovens, but that rule is largely for baking, where exact temperatures are more important for leavening. For roasting vegetables, cooking casseroles or baking most proteins, you’ll hardly notice the cold start and will save a lot of energy.
When you cold start, food heats up with the oven. This is more gentle with most foods and can yield better results. Roasted vegetables develop excellent caramelization. Casseroles heat evenly from the base all the way to the sides, keeping food hot throughout without getting burnt at the edges.
Cold Start Oven Applications
Roasted vegetables are perfect candidates. Arrange your seasoned vegetables in a cold oven and set it to 425°F, then turn on the heat. They should be beautifully roasted in 35-40 minutes. Heating them gradually gives them the time they need to release moisture slowly and caramelize nicely.
Casseroles also work wonderfully. Lasagna, baked pasta dishes or shepherd’s pie can begin cold. The gradual warming means the entire thing heats through evenly without the top burning long before the center becomes warm.
Bread in a Dutch oven is also another great use. Many bakers use cold start recipes for Dutch oven bread to perfection.
Cold Start Stovetop Cooking
You can also use this on the stovetop. Never begin cooking bacon in an already hot pan. Lay bacon slices in a cold skillet and heat over medium. As it heats, the bacon fat begins to render slowly and evenly, creating perfect crispy bacon that barely shrinks.
The same thing is true of rendering duck fat, crisping chicken skin or even frying eggs when you prefer slow, gentle cooking.
Energy and Time Savings
| Cooking Task | Standard Method | Cold Start Method | Savings |
|---|---|---|---|
| Roasting veggies | Preheat 15 min + roast 25 min | Roast for 35-40 min (no preheat) | Saves 5-10 minutes, saves 0.8 kWh |
| Bacon | Heat pan + cook 10 minutes | Cold start fry 12 minutes | More even cooking, less splatter |
| Casserole | Preheat 15 min + bake 45 minutes | Bake for 50-55 minutes (no preheat) | Saves baking time, better even heating |
| Dutch Oven bread | Preheat 30 min + bake 40 min | Bake 50-55 min (no preheat) | Saves 15-20 minutes, 1.2 kWh |
When Not to Cold Start
Don’t use cold start for dishes that need to maintain a certain temperature, such as yogurt or sous-vide. Cakes, cookies and pastries all require the correct oven temperature for accurate rising and texture. If you’re looking to sear meat for a fast crust, you need a preheated hot pan. Pizza requires an incredibly hot oven right from the start.
Use your judgment. If a recipe is built upon specific chemical reactions and it all has to happen at an exact temperature, then yes, you want your pan hot from the start. For forgiving foods like roasted vegetables, casseroles and many slow-cooked dishes, cold start is your friend.
Combining All Five Tricks
The real magic comes when you mix the techniques. Here’s what it would look like: You’re using trick #3 — batch cooking day on Sunday to make some protein and grains. You use trick #2 (pressure cooker) to make those grains in 20 minutes instead of 45. Then, during the week, trick #1 (one-pan method) involves combining that cooked protein with fresh vegetables in a 15-20 minute time frame. You pull trick #4 (microwave) as the one-pan dinner cooks to quickly reheat the grains. And you apply trick #5 (cold start) so that preheating is kept to a minimum.
And suddenly, instead of an hour or more, you’re cooking delicious meals in 25 to 30 minutes. Your energy bills drop noticeably. You have more free time. Your kitchen stays cleaner. This is the magic of smart cooking techniques coming together.
Additional Time-Saving Tips
In addition to the five primary tricks, here are a few quick-hit bonus strategies that support these techniques:
Keep your kitchen organized. Knowing where everything is saves 5-10 minutes each cooking session. Keep most commonly used items at eye level and in an accessible position.
Prep vegetables once weekly. Spend Sunday washing and chopping vegetables for 20 minutes. Store them right, and you have prepped-to-cook ingredients all week. You will save 10-15 minutes a day by just doing that.
Use kitchen gadgets strategically. Sharp knives cut prep time in half compared with dull ones. Veggies are shredded in seconds by a food processor. A rice cooker liberates valuable stovetop space and attention.
Clean as you go. This one isn’t a direct time saver when cooking, but it will save time in the dreaded post-dinner cleanup marathon. Wipe counters between steps. Start loading the dishwasher while there is cooking to do. All you have to do post-feast is eat, since most of the cleanup will already be finished.
Always keep your pantry full. No one wants to have to run to the store for a missing ingredient. Stock up on staples like olive oil, spices, canned tomatoes, pasta, rice and frozen vegetables. Learn more about essential pantry staples to keep your kitchen ready for any meal.
Measuring Your Success
Keep tabs on how far you’ve come to stay inspired. Take note of how long dinner takes to cook before putting these tricks into practice. Start tracking your time again after a couple of weeks employing these techniques. When using a combination of these methods, most people are saving 20 to 30 minutes per dinner (or more).
Monitor your energy bills too. Analyze your monthly usage of electricity or gas before and after you start practicing these things. Many families cut their energy bills by 10-15% just from kitchen efficiency.
The time savings compound dramatically. Thirty minutes saved on dinner five nights a week is 2.5 hours weekly, 10 hours monthly, and 130 hours by the end of the year. That’s an extra five-plus days back in your lifetime each year, simply by cooking more efficiently.

Frequently Asked Questions
Q: Are these methods compatible with special diets, e.g. vegetarian, vegan or gluten free?
A: Absolutely! These tricks are diet-indifferent. Vegetables and plant-based proteins lend themselves beautifully to one-pan cooking. Pressure cookers are perfect for beans and lentils — staples in a vegetarian diet. It doesn’t matter what type of food you enjoy, or if you’re eating a special diet — batch cooking and freezing can be adjusted to work for any cuisine. Just apply the strategies to any foods that fit with your own eating style.
Q: If I cook my food in batches, won’t it taste worse than if cooked fresh?
A: Not if you do it right. Many foods taste the same or even better after freezing. With soups, stews and curries, it’s often the case that they taste better from having the flavors marry. It all comes down to storage and reheating. Store in tight containers, freeze quickly and reheat gently. Foods with high water contents (certain cooked pastas or lettuce) are a little iffy, but proteins, grains and most cooked veggies freeze like champs.
Q: Are pressure cookers safe at all? I’ve heard scary stories.
A: Today’s pressure cookers are incredibly safe. They actually have several safety features: They have pressure release valves, can’t be opened when the lid is locked, and have an automatic shut-off. The scary stories often center on the old stovetop models from decades ago. Electric pressure cookers today have at least 10 safety features. Do as the instruction manual says, don’t overfill it, and make sure the pressure release valve isn’t clogged.
Q: How much money will I realistically save on energy bills?
A: That would depend on how you cook now and the price of energy in your area. The typical home that practices these five methods can shave $15-30 off its energy bill every month—up to $180-360 each year. Households that were cooking daily with ovens before find greater savings than those who were already cooking efficiently. Monitor your usage and you’ll have the right personal numbers.
Q: I have a small kitchen and only a few tools. Can I still use these tricks?
A: Yes! The one-pan approach is doable in any kitchen. If it’s just one new appliance you can afford, then make that a pressure cooker and save even more time and money. The microwave procedure calls for tools you most likely have at home. Batch cooking only requires a few extra storage containers. No additional extras are required for the cold start approach. Begin with tricks you can do on your setup.
Q: What trick should I start with if I’m just beginning to cook?
A: Begin with trick #1 (one-pan cooking). It’s the simplest to learn and one of the fastest for results. If you have a microwave (and with us spending more and more time in the kitchen, I assume you do), once you’re settled in, introduce trick #4. Then move on to trick #5 (cold start) with no special equipment or retraining involved. Once you’ve got these down, buy a pressure cooker and start batch cooking.
Q: Do these tactics apply to cooking for one person?
A: These hacks are really good for cooking when you’re on your own! One-pan meals scale down easily. Pressure cookers work fine with small batches. The power of batch cooking is actually stronger for someone who’s single, because you come out with multiple meals from a single prep session. Microwave efficiency becomes still more important when reheating individual portions. Cold start works well irrespective of how much you have.
Q: How can I avoid freezer burn when batch cooking?
A: Suck the air out of storage containers. Flatten the freezer bags before sealing and squeeze out any air bubbles. For liquids such as soups, allow little headspace in containers. If you can, double up when wrapping food. Use freezer-suitable bags or containers, not ordinary storage containers. Date everything, and use frozen foods within their suggested time range. If you cook in bulk on a regular basis, vacuum sealers almost completely eradicate freezer burn.
Final Thoughts
Cooking doesn’t have to take up your whole evening or crank up the heat on your energy bill. These five clever hacks boost kitchen efficiency without sacrificing the quality or taste of food. You’ll save time cooking, reduce your energy bills and savor delicious home-cooked meals.
Start with one technique you can use right now. Give it a week and see how you feel. As they become habit, add another one. Pretty soon, these techniques will feel so comfortable that you’ll find yourself asking why the hell you ever cooked any other way.
And remember: It’s not about perfection. Some nights you will do all five tricks at once. On other evenings you might use only one. Small steps really do lead to big results. Fifteen minutes here and a few cents there can amount to hours of time and hundreds of dollars saved over the span of one year.
The kitchen should be a place for creativity and nourishment, not stress and exhaustion. These smart cooking tricks take back your time and energy while still feeding yourself and your loved ones well. Your future self thanks you if you make those changes now.
Now go cook smarter. Your dinner is waiting, and it’s going to require far less time than you’re expecting.